Thursday, December 30, 2021

Minor - Facial Rigging and Scarf

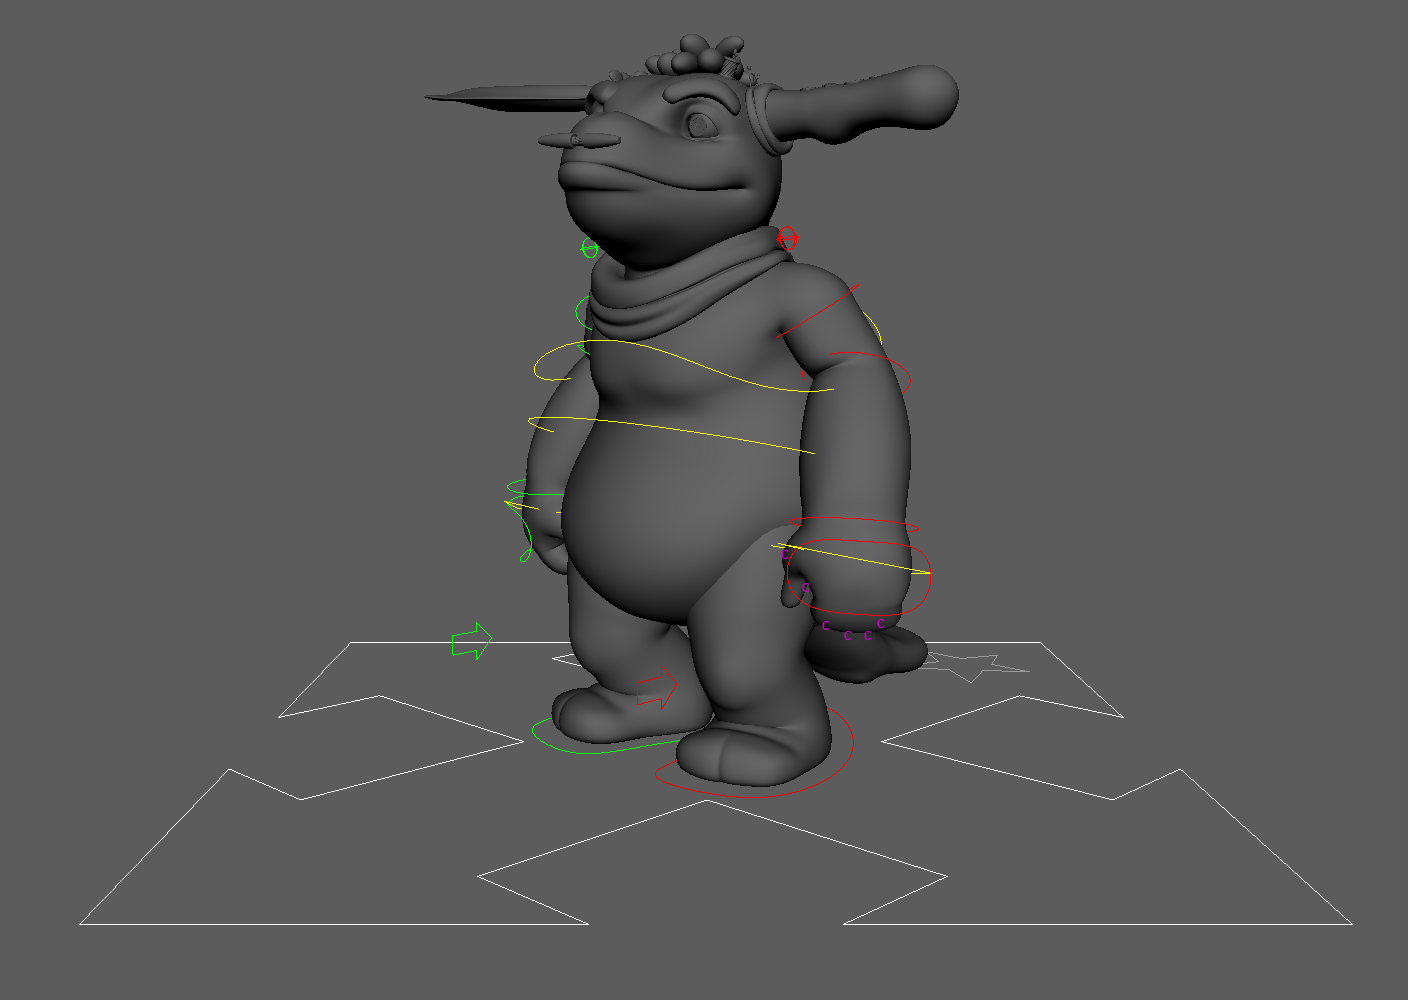
 After having a short rest, I decided to start doing some facial rigging. The "Sock-Stealer" now has a fully functioning mouth, eye, tongue/teeth and brow rig. For the extras, I have placed a small control so to create a snarling effect, one to lift the nose peg and finally one to puff out the cheeks.

For the teeth, I didn't like the ones I had modelled previously as I felt they didn't fit in with the character's design, so I modified a general set.    

When it came to rigging the scarf, using a dynamic set-up with the ability to place animation was just over complicating everything and I had several unsuccessful attempts to get it right. Thinking about what I needed, a simple joint to control set up gives me the desired effect.

So far, I'm quite happy with how the facial rigging has turned out. There are some areas that skinning/blending weights could do with refine, but currently I need to keep moving forward and if I have time, I will go back.

Next will be placing rivets for the buttons and figuring out the best way to rig the ears/ hair.  

Face Rigging Progression

Whole Rig Progression

Saturday, December 18, 2021

Minor - Ears/Hair Joint Dynamics Experiments

Before fully getting into facial rigging for the "Sock-Stealer", I decided to some tests on how the hair an ear would work. On the left ear, I will place controls but thought about using dynamic joints for the right to get a more flowing secondary animation as this is a thinner cloth.

When doing the dynamic test on the ear, I noted the top of the ear move with it and lost the desire appeal. So, I placed a second branch of bones and skinned the ear to both, this worked much better (as this was a experiment, I didn't worry about blending the skin weights too much).

After these tests, I am debating whether to just rig both ears and use the dynamic IK for just the upright strands of hair (the laying down ones can just be heavier stuffed locks). However, I will place bones in the hair regardless and if the dynamics don't work out, I may experiment with the same mythology for the tail and use a single control above the hair strands (connected to the master bone) to make the bounce. 

If I decide to use the dynamics for the hair, I will connect all the bone chains to a master one before the head base joint.

Although this has taken a day out of getting the rigging complete, I felt it was important to have a plan first so to not have to keep starting again if things didn't work out.  

Hair Test

Ear Test

Thursday, December 16, 2021

Minor - "Sock-Stealer" Rigging Pt 01

So far into the rigging process, I have managed to get my corrective blendshape working again and the body controls placed. The tail is now driven by curves and skin clusters. As the upper arm is quite short, I have left translates on so to be able to place more length if needed on more complicated movements. 


When I placed the hip control, as the legs are separate mesh they popping out quite far when moving. To solve this, I have placed another corrective blend shape but this is only effective so far, mean I may have to be quite careful with my animations.  

Pre Corrective Blendshape

Post Corrective Blendshape

As far as rigging the jacket, this is causing quite a number of problems and has been quite unsuccessful. I may leave this for the time being and move onto the rigging the face before returning back to the jacket. The same can be said for trying to place a IK arm controls and no-flip pole vectors, attempting these has resulted in no success.  For the buttons, I will most likely use rivets to keep them in place but again, this is something I will place at a later date. 

The rigging process has caused a number of problems and due to the design of my character, I am quite anxious about animating him. I feel due to the limitation set by the legs, he is going to be quite stiff to animate and won't capture everything I need. 

I have learnt quite a lot from the process so far and I am going to more likely remodel elements of my pipe-tappers before rigging them. However, as far as getting help in terms of the problems above, I have felt this has been very limited and trying to solve these issues myself by scouring the internet has just become heavily time consuming and frustrating. Originally I was enjoying this project, now not so much. I am hoping this will change the more the project moves on. 

Thursday, December 9, 2021

Minor - 3D Production OGR

 Environment 

 Bedroom Modelling

Part 01: https://kimberleydavis32.blogspot.com/2021/10/minor-bedroom-environment-modelling.html

Part 02: https://kimberleydavis32.blogspot.com/2021/10/minor-bedroom-environment-modelling-pt-2.html

Part 03: https://kimberleydavis32.blogspot.com/2021/10/minor-bedroom-environment-modelling-pt-3.html

Part 04: https://kimberleydavis32.blogspot.com/2021/10/minor-bedroom-environment-modelling-pt-4.html

Part 05: https://kimberleydavis32.blogspot.com/2021/10/minor-bedroom-environment-modelling-pt-5.html

Part 06: https://kimberleydavis32.blogspot.com/2021/10/minor-bedroom-environment-modelling-pt-6.html

Part 07: https://kimberleydavis32.blogspot.com/2021/10/minor-bedroom-environment-modelling-pt-7.html

Part 08: https://kimberleydavis32.blogspot.com/2021/10/minor-bedroom-environment-modelling-pt-8.html

Part 09: https://kimberleydavis32.blogspot.com/2021/11/minor-bedroom-environment-modelling-pt-8.html

Part 10: https://kimberleydavis32.blogspot.com/2021/11/minor-bedroom-environment-modelling-pt-9.html


Bedroom Texturing

Part 01: https://kimberleydavis32.blogspot.com/2021/11/minor-bedroom-texturing-pt-1.html

Part 02: https://kimberleydavis32.blogspot.com/2021/11/minor-bedroom-texturing-pt-2.html

Part 03: https://kimberleydavis32.blogspot.com/2021/11/minor-bedroom-texturing-pt-3.html

Part 04: https://kimberleydavis32.blogspot.com/2021/11/minor-bedroom-texturing-pt-4.html

Part 05: https://kimberleydavis32.blogspot.com/2021/11/minor-bedroom-texturing-pt-5.html

Part 06: https://kimberleydavis32.blogspot.com/2021/11/minor-bedroom-texturing-pt-6.html

Part 07: https://kimberleydavis32.blogspot.com/2021/11/minor-room-texturing-pt-7.html


Bedroom Lighting:

Part 01: https://kimberleydavis32.blogspot.com/2021/12/minor-lighting-progression-pt-1.html


Pipe Modelling and Texturing:

Modelling: https://kimberleydavis32.blogspot.com/2021/12/minor-pipe-environment-modelling-pt-01.html

Texturing and Lighting: https://kimberleydavis32.blogspot.com/2021/12/minor-pipe-environment-texturing-and.html


Character Modelling  

Sock-Stealer Modelling


Sock- Stealer Skinning 


Pipe-Dwellers Modelling


Music Production:


Minor - Pipe Environment Texturing and Lighting Pt 01

 With the pipes all modelled, the next step was to place some textures. Looking over some references, I felt that using a brick wall rather than insulation would give the scene a little more character. Also, making each pipe unique and aged would help. 

Pipe Texturing References

For the texturing, I used Substance painter and to start with, some stronger lighting so to gage the textures correctly. Once completed, I then reduced the lighting and placed some aiAtmosphere. To give that more "dusty" effect, I changed the fog to yellow and reduced the lighting. The lighting and textures may still need some alterations

UV's
Top Render
Mid Render
Bottom Render
Added Fog

Wednesday, December 8, 2021

Minor - End Credits Music Progression Pt 02

Final touches are being made to the music for the end of the animation, the composer has also been kind enough to make a night time variation. I really like both of these so it is going to be hard to choose which one I will use.


Composer: Tom Will Morris - https://linktr.ee/TomWillMorris

Tuesday, December 7, 2021

Minor - Lighting Progression Pt 1

 Working on the night-time lighting for the room, it is proving to be quite a challenge. I don't want the room to be flooded with the moonlight so the scene is blown out but I also don't want it too dark. In these images, I have a Skydome with a ramp texture, a sphere with a emissions maps to create the stars and 2 spotlights. One is used to make a make the overall moonlighting and the second is for a more concentrated effect.

to get the stars right, I removed all the lights and concentrated just on the emission map, working my way though the lights individually.

In the angled view, the lighting looks fine but It is much too clean so I decided to place a little aiVolumeAtmosphere in the scene. This is ok, but blew the lighting out and is making it a little hazy, even after some tweaking. I am also wondering in the shadows are far too dark, I will go back in and reduce the shadow and play around with the fog settings a little more.

Also, I want to place a little rim lighting on some objects such as the mirror to help them stand out more. 

Scene with White Lighting
Lighting Reference

Lighting Emissions and Skydome 
Top Angled View
With Added aiVolumeAtmosphere
Window View
Final Door Lighting
Added Tree Proxies

Saturday, December 4, 2021

Minor - "Pipe-Dwellers" Texturing Pt 01

Before doing any rigging, I decided to do the texturing first and the main reason behind this was time. I feel that rigging the "Pipe-Dwellers" is going to take a lot of trial and error to get right, so rather than rushing the texturing at the end, doing them first to allows for extra time to concentrate on problem areas. Also, by having the textures completed, I can check for any odd deformation in the geometry when moving the joints. 

Secondly, I enjoy texturing a lot so doing this gave me a short reprieve from feeling stressed out. 

The texturing was all done by using various fabric and grunge materials in substance painter. When transferring back into Maya, I mainly stuck to using normal maps as these will place less stain on the viewport. However, some bump has been used for the thimbles and the cotter pins. As these critters mainly live in the wall cavities, they needed to a good level of dirt and wear in their appearance but not too much.

I may go back a look over the textures at a later date to see where improvements can be made. I have found a few different quadruped rigging tutorials, so I am hoping these will help me get the bases and then incorporate some of the JPJ/ Year 3 Rigging ones.  

Eye Render (IOR 1520)

Minor - Pipe Environment Modelling Pt 01

Reaching a good point on the character modelling, I've decided to switch back to the pipes in the wall cavity. Although there is more to do on the bedroom also, I felt moving on and then returning will give me a fresh set of eyes to see for any alterations needed.

Pipe Modelling References

When modelling the range of pipes, I tried not to over flood the scene so to distract the audience too much. What is most important is having a good amount of "upwards" pipes so the "Dwellers" can climb. Also, there needed to be a range of flat surfaces for the nests to be on.

Also, I was thinking of just keeping the walls in the background as brick and not placing and wood/insulation as this may distract from the animation taking place. I have added a camera with some animation so to judge the placement of the pipes for the creatures. 

Pipes 01

Pipes Front View

Top Render
Middle Render 02
Middle Render 01
Bottom Render

First Play blast

Major - Submission Post: Final Animation, Reflective Statement and Links

Final Reflective Statement When starting the Major Project, there was still quite a lot of work left over from Minor for the planned final...