Showing posts with label Digital Painting. Show all posts

Saturday, June 26, 2021

Continued Learning - Life Drawing 1

  Continuing on with digital painting, I decided to do some painterly blocking of a online model. I mainly concentrated on form rather than finer details and experimented with tone. For the skin, I placed some greens/ yellows and some brighter oranges for subsurface scattering. I quite enjoyed making this an will more likely continue on with the hope of improvement. An area that needs work is stronger contrasts and deeper shadows.


Wednesday, June 23, 2021

Continued Learning - Photshop Painting 1

  One of the goals I have set myself over the summer is it keep experimenting with digital painting, mainly to try and remove outlines. This is the outcome so far. It fair to say I have a fair bit more learning to do as the character doesn't quite blend into the background, but I'm happy with the current progression and will keep experimenting and learning.


Tuesday, March 30, 2021

Premise: Animatic Pt 1 - No Sound

   Staring on the first part of the animatic, its taken more time to sort out premiere then actually create the animatic itself. These seem to be a bug which is causing premiere to not export properly and the same with media encoder, therefore I had to use another way to create the video.

  Currently there is no sound and some changes will be needed for the timing, but this is a good start. The second part will be made and then both parts placed together, ready for sound application. I will also need to think about end credits and any music that is needed.

Tuesday, January 26, 2021

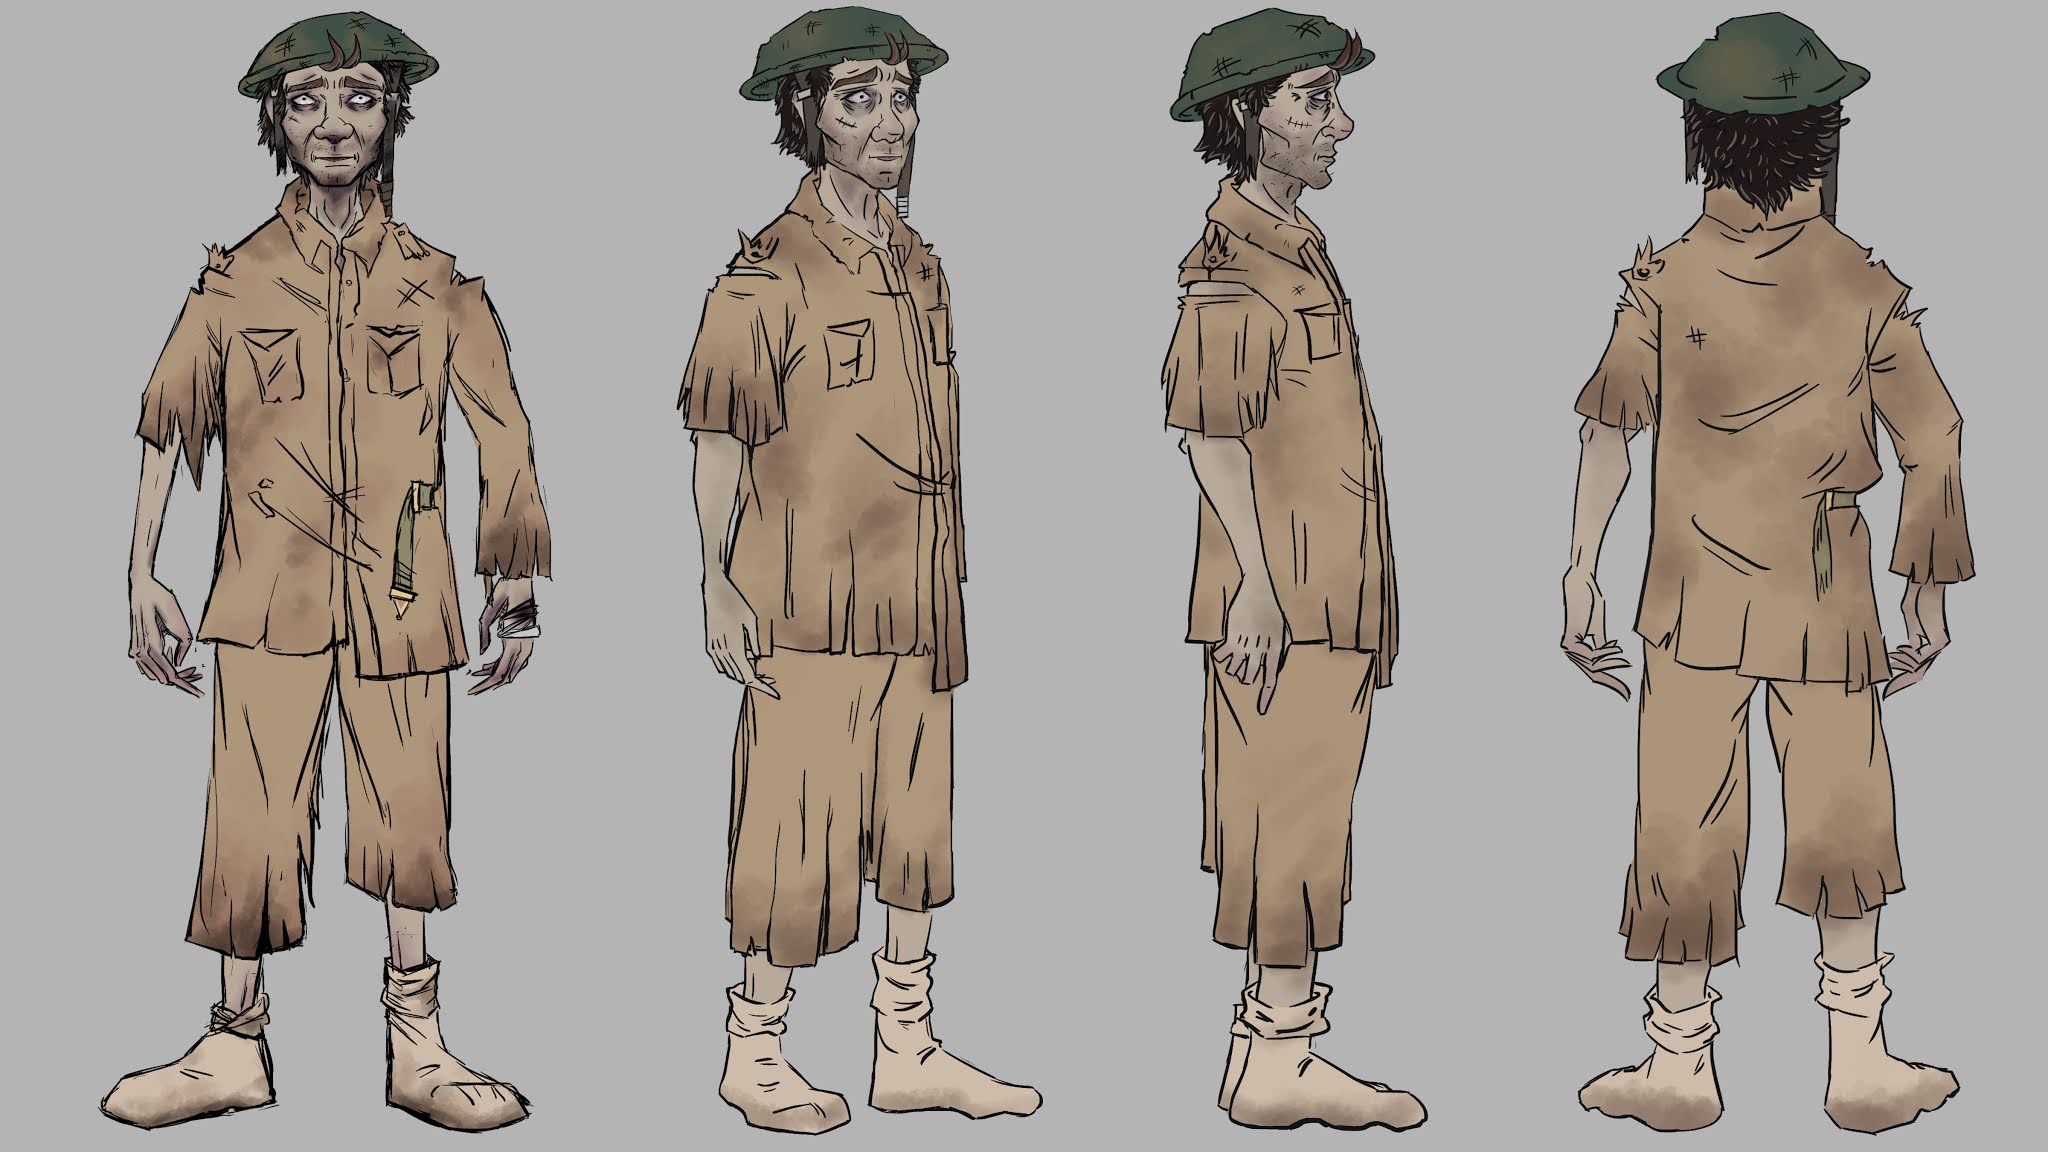
Toolkit 2: Character Design - Turnarounds

  So far, I have created two turnarounds. I am hoping to move onto the third and final before drawing up gesture sheets. Creating Turnaround was a new experience and took me awhile to really understand, hopefully making the next one will be much faster.

Chester Turnaround


"Zombie" State Turnaround

Saturday, January 23, 2021

Toolkit 2: Character Design - Expression Work Continued

  Having finished the collaboration project, I wanted to get back into Character Design after having a few days rest. It has been so long since I've even had chance to pick up a pencil, starting the expressions was quite difficult. I had become very rusty.

  However, after a few hours of doodling I started to loosen up and drawing started to become easier again. As I have already done a few emotions for Chester, these are extra.

  Out of all of these, the wife hallucination was the hardest to do. I still had to give her expressions that would reflect the wife, meaning the main character would trust it. The sharpness due to the German Expressionism made drawing her expressions quite a challenge.

  As with "Zombie" state, as he wouldn't always be "zombified", he would still have some normal emotions. Sadly, I doubt he would have many happy emotions, maybe one or two slightly hopeful ones. If I have time, I will do more but next will be turnarounds and gestures sheets.

  Expressions is something that still needs improvement, mainly trying to make sure they keep the represent of the character. Some of these have move away slightly but I enjoyed drawing them, it made a nice change. 

Chester  "Pre-Zombie" State


"Zombie" Expressions


Wife Hallucination Expressions


Monday, December 28, 2020

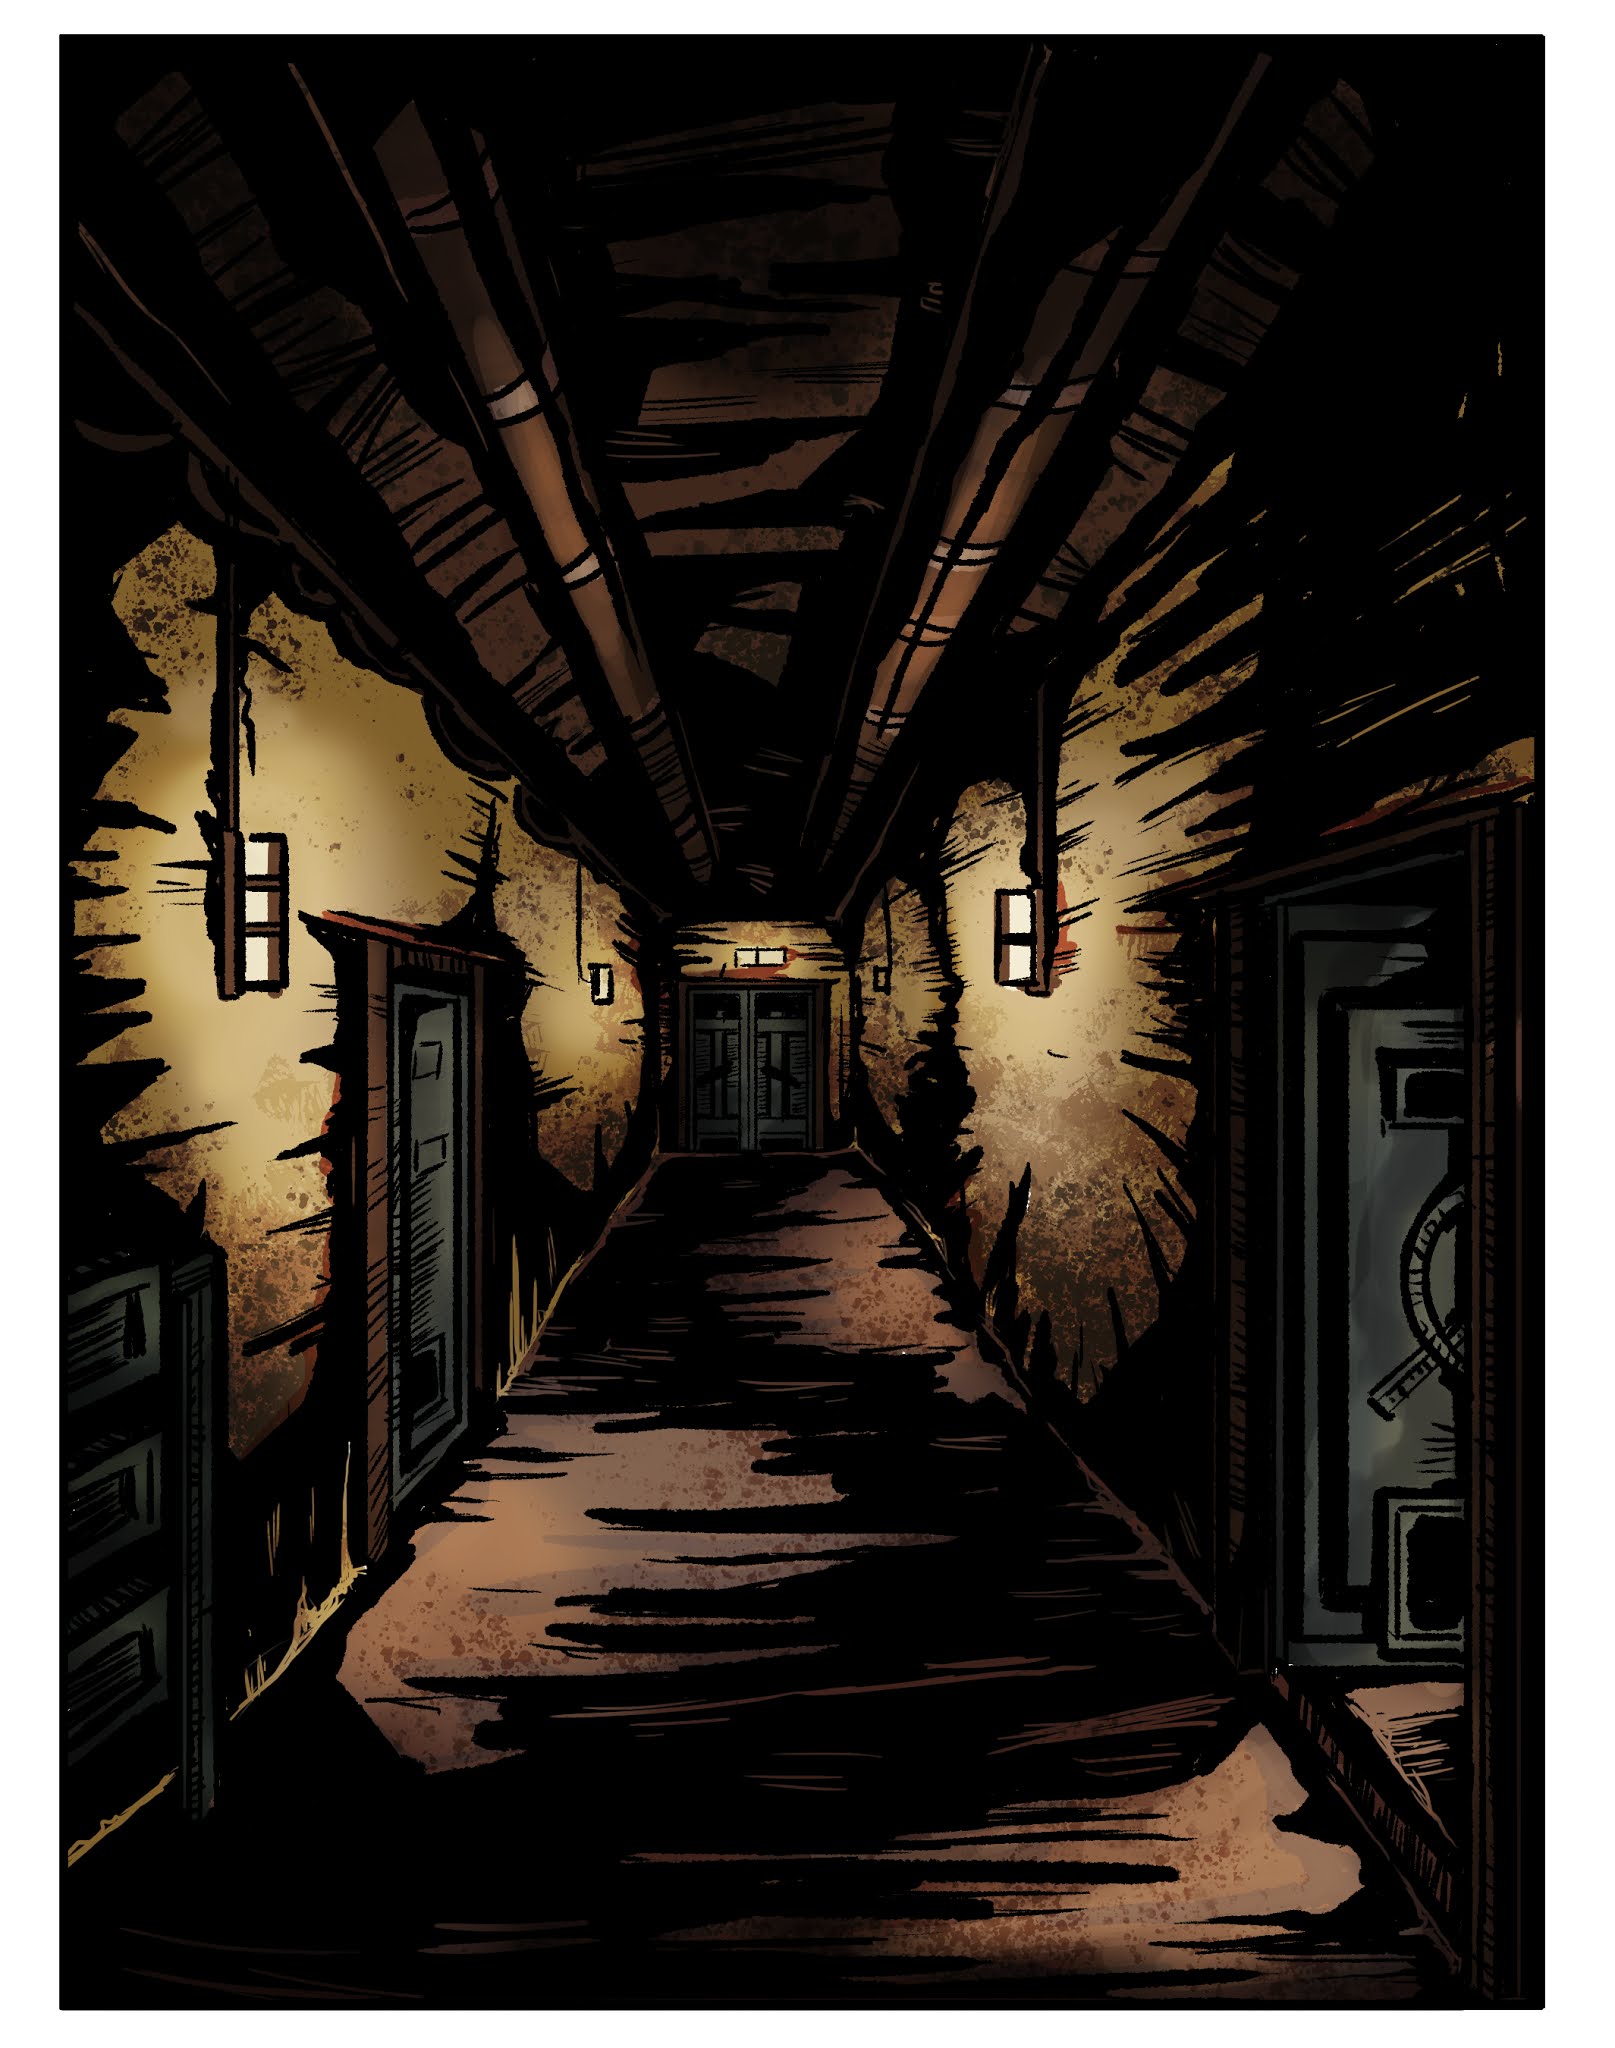
Toolkit 2: Character Design - Continued Environments Development 2

  Moving on to the corridor/ bunker main door (as with the observation cell), I created a normalised version first and then drew the wood-cut Germen expressionist style overtop. In terms of colour, I decided to experiment with how different layer styles would look in helping to create atmosphere. 

   The painting itself has returned to a more outlined aesthetic. Using the more painterly style took up too much time and more energy then needed. The emphasis for these designs is on the lighting/shadows, not so much the painting style. 

  Once the medical area is done, I will work on warping the environments further. 

Normal design

Subtract Overlay

Linear Light

Colour Burn - Too Dark

Sunday, December 27, 2020

Toolkit 2: Character Design - Continued Environment Development 1

  Working on the environments, I started with the observation cell. As the protagonist would have been in there for some time, making it look "wrecked" may reflect how his emotions would escalate during periods of his isolation. Discussion with my tutor lead to some elements that may be present, such as ripped up cloth/bedding, neglected food and scratches on the door. 

   Starting with trying to capture the real, I went with a more concept/painterly effect and tried to bring in shadows. With this in place, I then wanted to place the "Wood-Cut" style of the 1930 German expressionism in the same lighting. The twisted environments will need to match the side-kick's appearance as she take over control. Currently I have kept them fairly similar in proportion, but wanted to gain a better understanding of the look before adding any warping. 

  Environment painting is a area of mine that needs alot of improvement. As I have not done much of it in the past, I find it very difficult to complete without any outlines. I want to really expand in this area and grow more in developing dynamic lighting/contrast. 

  Next I will explore the other areas of the bunker. 


Wednesday, December 23, 2020

Toolkit 2: Character Design - Main Character Design Development

  Looking over my designs, I realised I have done a lot on my sidekick (a illusion of the main character's wife due to the psychotics) and not much more on my protagonist. Firstly I wanted to give him a name, after some debate I felt that Chester suited his original personality. Although I won't really be using his normal form, I wanted to have a more sold bases of what he would have looked like before the deterioration. 

  For the transformation, I made his pupils more dilated to give the effect of the drugs being in his system, as well as making him thinner and more unkempt. His skin would become greyer and more sullen due to the lack of eating real food, his changed perception just wanting more of the substance altering him and relating it to a food source. In thinking about the effects the experiment would be having to his psyche, dark circles would appear due to insomnia and a heightened sense of anxiety would make him jumpy at noises. 

  Being honest, the more I do these design, the more anxiety I have about the pushing them. This is quite a dark story, esp with the sidekick (wife delusion) enhancing the protagonist's downfall and I'm wondering if to bring these back slightly so to instill hope rather than despair. 


Chester's (Protagonist) Head Turnaround

  In creating these designs and following my tutors advised, I tried to make sure both "states" look alike so as to not mistake either as a different character. Again, I am wondering if the "Zombie" state is too far pushed and if it need reeling back. 


Chester's Transformation ("Zombie" State) Head Turn-Around

Full Body Transformation

  Now I have done these, I will move onto characters interactions and the environment. For the environment, as the "wife" takes over his psyche more in leading him to the "food", it will warp to fit her appearance her her to become more overpowering. 

Saturday, December 19, 2020

Toolkit 2: Character Design - Twisting the Sidekick

   Working from one of the first transformation designs, My tutor and I discussed further ways to twist her form as the protagonists mental state changes.  Below are some experimant designs and a head turn around. The first idea was placed so I can keep a visual of her design. As she chnages though out the story, the enviroment will chnage with her and in this style. 

  As the design is based on Enrick Heckel and Karl Schmindt-Rottluff's wood cuts, I wanted to keep her form fairly flat, almost as if she has been carved from wood. I'm not sure if this is apparent, this may need a little more tweaking to get right. 

Further Twisting

Three-Quater Turn Around

Monday, December 7, 2020

Collaboration: Bell Hop - Orthograpthics

  Before making a more finalized set, I created some Orthographics of the main assets to help with the modeling process. For the rest of the Hotel Lobby (such as the pillars and ceiling), this may be a process of trial and errors to get right. I tried to keep to the 80's style and colour pallet, which marble seems to have a pinkish hue to in some lights. There may be more Orthograpths to come depending on the set development. 

Reception Front
Reception Side

Lobby Chairs

Bell-Hop Trolley


Floor Texture 1

Floor Texture 2


Travel Case 1


Travel Case 2

Travel Case 3

Saturday, November 28, 2020

Toolkit 2 - Character Design: Soldier Expression Work

   The soldier character for my story will have a more comical art style before transforming into his "zombie" state. This is where I will try to introduce the 1930's German Expressionism Art, as with the warping environment. I tried to grab some possible look that would suit his personality. As he is quite serious serious about his job but likes to have a laugh, I aimed mainly happier expressions.


Pre-Zombie State Expressions

  It seems it been a bit of a slow day today, I aim to have more styles and expressions done shortly. Doing these concepts has also helped me solidify the character's appearnce more. 

Thursday, May 7, 2020

Fantastic Voyage - Finalised Animatic with Voice Over


 As the project continues to move forward, I have now completed the animatic with professional voice over artist - Donna Bayliss.  Working together with her was a absolute pleasure, and I hope to work with her in the future on other projects.

Friday, April 3, 2020

Fantastic Voyage - Production Art 2

Coming towards the end of my production art, I'm quite happy with how these have turned out. In thinking about the names of the cells/proteins, I'm wondering whether to have the appear alongside them rather than them to twist and reveal the name. This is still a step to figure out.


I still need to think about the lab environment, and locking down the final appearance of the centrioles. But for now, I'm going to move on to finalising the script. Perfecting the animation/soundtrack, searching for a narrator, then moving on to modeling and pre-viz.


Matte Paintings

Monday, February 10, 2020

From Script to Screen - Final Dog Concept Art


   So on reviewing the Boomer the Dog, I decided that rather than a bloodhound, a Golden Retriever/ Labrador would be better. Not only are they incredibly playful and like to jump about a lot, but are used in the detection of bombs, so they fit Bill perfectly. After some sketched, I decided to place a green scarf around his neck with a bomb logo on it, so there is a bit more of a connection to Bills past. As Boomer is quite puppish, I tried to keep that youthful and overly excitable appearance in his design.

Sketch 1

Sketch 2

Sketch 3

Facial Expressions 1

Facial Expressions 2


Final Concept Art
Name: Boomer
Age: 2
Height: 22"
Colour: Golden
Gender: Male
Personality: Highly playful and puppy like. Boomer enjoys to jump around and chew on his favorite toys, but his favorite game is always fetch. Boomer was given to Bill as a puppy by his friend, who wasn't able to look after him anymore. Bill took Boomer in as he reminded him of his loyal companion when he was in the Bomb Disposal Squad, Trigger.

Thursday, February 6, 2020

From Script to Screen - First Animatic


    My First animatic for my animation, the title is a working progress and may change. This was quite a challenge but a enjoyable one, what took the most time was cleaning up to drawing to animate. This test has ran a little over 2 mins, and some areas are quite fast, so a little tweaking is going to be needed.


Friday, January 24, 2020

From Script to Screen - Theatre Concept Art


The finished concept art for my theatre. This took quite some time and although I can see some improvement, environment art is something that I aim to work on more. 


Wednesday, January 22, 2020

Sword Concept Art and Production

   As the story is reaching its final point, the sword is made of wood and snaps, so its design is a bit beaten a worn as its just a practise/ prop sword. For the concept, I felt it best to sketch a few different styles to see which would fit the profile best. I decided on a broadsword, this may be for a play in production

Sword Concepts

Painted Concepts

Cartoon version
First Finished Design

Altered Finished Design 

  The first version of the finished sword had more wood showing through the peeling paint, but I thought its best to remove it as I want the BDE to think its metal.

Wednesday, January 15, 2020

From Script to Screen - Main Character Redesign


   Following the previous character design class, I've decided to do some more sketches and redesign the main character Patrick. I know he is friendly, eccentric, a bit proud, slightly bumbly and in the late 50's - early 60's age range. So with these bases, I tried to aim for circles and square types. Also, I wanted to experiment with changing the body proportions and sizes a little. As the new version of Patrick is a  retired Bomb disposal Expert who is now a Janitor, I looked up 1950's to 60's workmen uniforms.

   These designs are much better, and I will probably use one of these to be the person of the main character. On looking over these again, some of these may appear a lot older than the age bracket. So, when moving into the more finalised image, I will have to bring his appearance younger to match his age.


Overalls don't seem to change much though put the years, so it's gonna be a cause of making them unique to the character an the time period.


Add caption

Wednesday, January 1, 2020

Organic Vs Hard Surface Modelling Practise


I decided to give the Organic and Hard surface tutorials a go. Although it took longer, I found that I enjoyed doing the organic style more  Also, these models allowed practise in debugging, and manage a pipeline. Mainly, I focused on the UV wrap and Occlusion styles. 


Organic Model - Creature

The eye of the creature has a second sphere, which has been made transparent to give a reflective eye effect. I didn't go too much into detail on the painting as this is just for practise.

Creature Finished Model
Finished Creature with basic UV painting
Creature with Pipeline


Hard Surface Modelling - Scooter

Modelling the scooter was a bit harder, I found I had some trouble with laying the uv's and seemed to make doubles of some of the geometry on the body/ foot board. However, It was good practise, and gives me something to build on. 

Finish Scooter model with SkyDome for lighting
Occlusion 
Uv Mapping
Wireframe

Major - Submission Post: Final Animation, Reflective Statement and Links

Final Reflective Statement When starting the Major Project, there was still quite a lot of work left over from Minor for the planned final...