Thursday, October 31, 2019

Maya Practise - Lego Plane


  A second attempt at making an animation in Maya, using the bases of the previous legocar lessons and online tutorials. In this version, I have managed to program the propellers to spin when the plane moves in translate. Doing this a second time is a good recap, the practise was much quicker with fewer mistakes. Although, the propellers do seem to change direction in spinning during the skid, I'm not sure why it does this but its doesn't cause any problems to the animation.


Screen Capture of the Plane Pre-Render


Playblast GIF


                                                      2 Second Animation

Photoshop Workshop Exercises

 Over the last 4 weeks, we have conducted 3 different Photoshop skill exercises. The first was using lines, warping an perspective to interesting shapes an distance. 

The second practise involved taking photos, blending them together and using colours over them in order to create new environments. 

Using master studies was the third exercise, trying to replicate the colour pallet and how the different can hues create distance (these are on another post on this blog).

The final lesson was concentrating on the digital paintings we have made so far for our Invisible Cities projects, having tutorials in improvement.

First Photoshop Exercise

Second Photoshop Exercise

Wednesday, October 30, 2019

Invisible Cities Reflective Statement


  Delving into concept art, the bases of this project is gaining a beginning knowledge into planning world creation. As creating a new environment from imagination can be quite daunting, instead we were given several texts from Italo's Calvino's book, "Invisible Cities". Each passage of literature contains a description of a settlement, detailing it's construction, ambience and the inhabitants that live within. Following this, we were tasked with creating over 100 thumbnails. As 13 cities where given, this meant there had to be at least 10 designs each, stopping at 100 would not have been enough. Once completed, we were able to choose a city that invoked the most powerful thumbnails and develop influence maps. These influence maps (board boards) help in creating a more in-depth idea into the city, bringing in colour pallets and small details. I decided on Diomira, the city of silver domes. I chose this one as it was the most enjoyable to sketch and allowed some freedom in vision. Participating in perspective exercises gave a better understanding in composition, while participating in master painting studies and colour theory means we can understand how hues can create the illusions of distance. Having tutor input throughout our progress gave us insight to areas that was going well and support in ones that needed a little tweaking. With all these elements, we are presented with a starting point to create three final digital paintings of our chosen city. There is a criterion to what angles need to be illustrated for the concept. They are an exterior establishing shot, an interior one and a low angle establishing view.


   Thinking about what went well over this assignment, the quality of the thumbnails enabled a good amount of detail for later stages. At first, the prospect of creating so many designs seemed off-putting. However, I found once I had started doing the thumbnails, they began to come me quicker and developed more expression each time. In the final paintings, when doing the main sketches, I could see my perspective planning showed some improvement. doing the perspective exercises allowed for this. The Thumbnails and digital paintings gave room for experimentation in styles, and though this I found what worked best for me at this time. Originally starting in soft shading, I found that cell shading to be much more beneficial and created a better range in detail and tone. The second development of the interior shot showed a better understanding in creating a lived-in establishment, and the composition actually invites viewer in as part of the scene.


   However, there isn't as much detail as I would have liked in these final pieces. The first one (having done hardly any digital painting before) is far too symmetrical. The clouds, trees and statue have no presence, and the softly softly shading doesn't hold any presence. The mirror tool I learnt, is not the best for environment concept. I had used it far too much, making a boring and mundane composition. Also, I seemed to have underestimated how much time research can take, leaving me with much less time for the final paintings. Being unimpressed with my previous compositions meant a complete re-planning of my final two pieces, taking up more time the intended. Due to this, I didn't have time to create a new colour scheme or lighting plan for them, so it was a small case of hoping for the best and relaying on intuition.


   Although there is a lot wrong with the first digital painting, I have chosen not to change it. This is something to learn from, and acts as visual way of not making these errors again. To improve from this project, more practise in Photoshop will help gain better knowledge in blending modes and detailing. Also, the continuation of perspective exercises will help in creating more dynamic and natural environments. In my spare time, following some tutorials will continue these developments and boast my skills, eventually boast my productivity.

The Art of Invisible Cities - Diomira and Presentation


  Art Book


Presentation

Tuesday, October 29, 2019

Final Digital Painting - Diomira City Establishing Shot

   In reviewing my last establishing shot, the current design didn't hold a appeal or invite the viewer in as part of the scene. So n talking to my tutor, it seemed to be better the scene was to twist or be slightly off center, making it more visionly engaging. Heeding that advice, I made some new compositions, decided on the one I thought was best in telling a story and went for it. I wanted to keep the simple cell shading style with some textures, furthering my experimentation with colours on a night based scene. 


3 New Compositions

First Sketch and Perspective

Second Sketch and Lightening

Block Colours

Final Painting with Layers


Establishing City Creation GIF


Monday, October 28, 2019

Final Digital Painting - Diomira Internal Shot

     So, trying to take on some of the advice given from my previous painting reviwe with my tutor, I decided to do a little re-plan on my internal painting. Making the room a lttle messier makes it more inviting, like a person actully lives in the building. As its a trading city, it made sense for there to be paperwork, books with accounts, shelves and due to the high amount of religous symbols, a small worshipping shrine. Also, placing objects nearer the foreground allows the the viewer to be more involved in the scene, and as its closer they can be darker with less detail.


A new Internal Sketch
Final Sketch with Perspective Lines


Final Block Colours

Final Capture


Internal Shot Animated GIF


Life Drawing Session 2


       Today session involved a male model. We started with a a few 5 minutes full body poses, moving into 15 minutes ones so to gain more guesture and detail. After a quick break, we concentrated on the facial and emotion expressions, really trying to focus on capturing them on paper.


5 Minute Sessions


2 x 15 Minute Poses
                                   

3 x Facial Drawings
 One thing to take from these, is I may have to think about making darker marks and filling the page better. 

Friday, October 25, 2019

First Digital Painting - Diomira Exterior Low Angle Establishing Shot


    Having never done a full digital painting before, I found this to be  quite a challenge. In perspective, I was hoping to achieve a 3 point "looking up" angle on the tower and statue, making the Cockeral smaller to give that sense of distance. Orginally going for a more block style shading, I seemed to have gotten carried away with softer style shading. 

  In speacking to may tutor, this piece is much too symmetrical, the trees , walls and tower is too dead centre. I managed to change the clouds with warp to break that up a bit, but this image doesn't invite the viewer in as part of the scene. It would have been a better compisition to have the tower more to a side then central, and to have more objects to the forefront.

  Changing it would have been quite difficult at this point, so instead I have chosen to keep it the way it is and move forward with new lessons learnt in colour and composition.  


First Final Digital Concept


Animated GIF of Concept Creation

Animate Practice Character Bounce


  Using the previous template of the squash and stretch bouncing ball, we made little characters using the same principles. These characters didn't have to be complicated, just the chance to apply previous learnt techniques to gain a better understanding and squash and stretch.

   During the bounce, any extra characteristics was to follow in the frame behind, this gives a feel of movement and personality.

The first two (Rabbit and Tail) would roll to a stop, in the last one (Whisters) I wanted to make a spinning stop.
Rabbit Bounce

Tail Bounce

Whiskers Bounce

Original Ball Bounce

Wednesday, October 23, 2019

Diomira Internal Thumbnail


   Post the completion of the previous external colour thumbnails, I decided to try and design what the inside of the domes would look like. In keeping with the silver, I wanted to break up the contrast with a little purple for the lanterns (the text lists about multi-colour lights for the food stalls, so why not in other places). In trying to keep with the eastern aesthetics, the incorpation of dark wood and sliding doors would hopefully keep the persona.

Diomira Colour and Perspective Thumbnails


  Starting the planning of my final digital paintings, these some ideas with colour and perspective. The perspective still needs alot of work, and the contrast in colours needs to be greater, but these are a good base.Diomira is basicly a city of greys (silvers and leads) and bronzes, with various splashes of colour. So using this detail, the crystal of the theater will illuminate colours on the reflection of the silver domes. Also, on the glass tower, I wanted it to have more of a cut crystal appearance, to fit along side the theatre. Next is to work on a interior designs. 


Tuesday, October 22, 2019

Diomira House Rough Ideas


     Some ideas of  house sketches for my version of Diomira. I know that my citie is a Utopian state with a busy market trade, many tavellers across vast distances to barter and pray. As the city text describes, it has over 60 silver domes. Making these into homes means I could play with the designs a little, but have to keep the key note of them being silver. I wanted to incorporate the eastern identity into the designs, but keeping them simple. In relation, this is about planning ahead to the final paintings, and keeping with in the time set for completion. 

     Although both are outlined, I chose two different types of brushes to experiment with painting effects. Using the cartoon inking brush gave a more dynamic appeal, having a more scuffy edge then the soft round brush. When making the thumbnails for the final paintings, I want to try and move away from outlines. Although I like the look that some inking can provide, for this project it may not be the right way to go. 


Lego Car Rendering and Animation


    Moving on from making a complete rig for our lego car, it was time to create the animation. Changing the frame rate from 200 to 35, this gives us a shorter sequence and the main key frames at 1 and 30. Key Frame 1 was the cars starting point, and the 30th was the finishing, with a small added skid to give our car a little realism. The cars movements was much to fast the whole way though, so using the key graphs, we are able to manipulate the increase and decrease speeds at selected points, whilest adding a extra keyframe. Bringing our plane in, a JPEG of wooden floor made it much too dark, and altering the UV settings made the image not seem so plastered on top of the plane. A change in the floors angle made the wooden slates not so perpendiculare to Lego car. Going back into the lightening, by removing the tempory source and creating a dome, we was able to place a light up JPEG environment, increasing the exposure to remove any darkness.

  Creating an Arnold camera, and locking it in the correct place, we have the perfect view of our animation.  Continuous render-viewing showed noise on some surfaces, which is deemed natural in Maya renedering. Post some clean up and render setting changes, it was then tiem to create the actual aniamtion its self, which timing changes depending on the computer used.

Adding a Shot Camera for Animation

Dome Light Envioment

Final Lego Car Render Post Clean-up.

Lego Car GIF - No Floor or Lighting


Finished the Lego Car Animation by using After Effects and exporting into a H.264 with Encoder, creating a mp4 format.

Monday, October 21, 2019

Life drawing Session 1


    Its been a long time since I've participated in doing life drawings, and this session proved that I am more out of practice then I thought. We was given a choice of loose paper on a easel, or to use a sketch book, to me a sketch book is a better way of keeping work. We started with 5 minute warms up exercises. The first was to capture our models gesture in a max of 10 marks, no feathering sketching (which is very much my way of drawing), secondly was to place as much detail as possible without removing the pencil from the paper. The third was to think of how we can use rectangles to understand form. giving a more 3D presence. As for the forth, we was only to outline any shadows on our life model, and the last was to use any of the previous techniques (I used the continuous line one).

5 Min Exercises

     Following these exercises, we moved on to 30 minute stretches. We was asked to try an use correct measuring techniques and capture as much detail as possible, keeping in mind perspective and gesture.
1st 30 Min Pose

2nd 30 Min Pose
    These started well, but I may have lost my way with correctly measuring proportions. Our model was leaning more on her elbow in the second pose, that gesture seems to become a bit lost. Also, I seem to be making my model much too big for the page, missing her feet. However, doing these life drawing sessions is a good starting point in understanding anatomy, and next time by taking more care I will hopefully fit the whole model on to the page. Gaining the correct measurements will improve more the measuring techniques are used, and perspective will fall into place.


Shadow Only Charcoal
Our last one to cool down was to just capture the harsh shadows, putting light as forefront. This one was a lot harder, using charcoal so to smudge softened some definition. 

Friday, October 18, 2019

Bouncing Ball Animation

  So to further our knowledge on timing and spacing, we conducted the the bouncing ball test on Animate. The key here is understanding that different elements are not all the same. A heavier ball will not bounce as well as a rubber ball, but gravity will still give the same falling speed from a height. Understanding this will gives us a greater knowledge in walk cycles and object manipulations.


Bouncing Ball Exercise


Heavy Vs Light

Master Studies and Rule of Thirds


   To gain a good idea of contrast, colour theory and perspective, we was asked to take some of the old masters work and try to replicate the composition as much as possible. This was more to gain understanding then to place detail, the first one seemed to have turned out much better then the second.
Frederic Edwin Church - Cotopaxi
Frederic Edwin Church - Twilight.
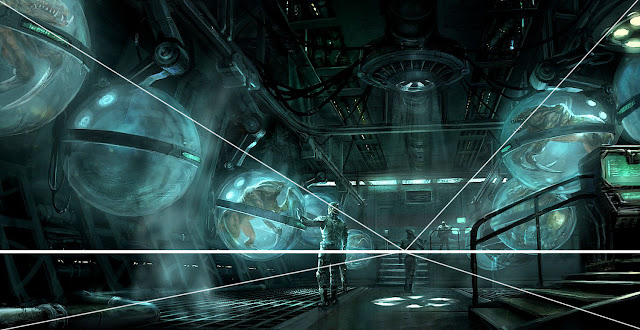
   It was also requested that we use some concept environment art and place the rule of thirds and perspective, This allows us a idea of how the artist was working.

Rule of Thirds - Sergii Golotoskiy
Perspective Point

Rule of Thirds - Unknown Artist

Perspective=

Major - Submission Post: Final Animation, Reflective Statement and Links

Final Reflective Statement When starting the Major Project, there was still quite a lot of work left over from Minor for the planned final...