Stylised Internal Lighting
This tutorial is aimed at using stylised lighting to give a scene more life, and show at how sampling can improve the shadows/ reduce noise. Firstly we created a pointlight to act as the main lighting source, changing the exposure to 12 and increasing the shadow samples. This was done without the objects present in our sense so to get an idea of how well it would light up the room. Once happy with this, we placed another point light in the hallway to light up the shadows, and then two directional lights to give the feel of midday sunlight.
 |
| Main scene |
 |
| Scene with out lighting |
When taking a render, we placed the test render at 50%, this allowed a decrease in render timing at a lower quality. Increasing the samples also decrease the amount to light spotting present, this can be common when lighting is too close to a plane/ object.
 |
| Main point light |
As the shadows was much too dense, we brought up the radius to soften them out.
 |
| Increased shadows/ softened shadows. |
Placing two directional lights though the window planes give a strong sense of sunlight, we wanted a just a touch of light to be present on the window plane itself. For the background outside, we just change the maya world to blue, this is just temporary but allows us to judge our colours better.
|
 |
| Added directional lighting |

With the objects back in place, we had some "blow out" on the plates/ cups, losing the finer details. The shadows was much too dark, so we changed the exposure and the shadow density on the lights to improve the quality. However, we needed to identify where some of our shadow noise was coming from, so under the area light and main point light, we placed a light decay. Using the near and far attenuation, we was able to use the arnold render to single out the diffuse. This showed that the direct diffuse was clean, but the indirect was very noisy, so we increased the sampling.
|
|
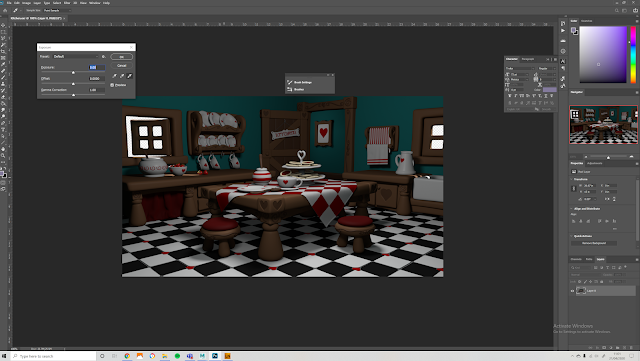
Once happy with the render, we saved the file out as a EXP and placed it into photoshop. Choosing to have the transparency options on, the EXP file keeps the colour quality to its highest standard at 32 bit. We wanted to lighten up the scene a bit as its much too dark still, so going to adjustments, we brought the exposure up.
Finally, as the colours are too blue, placing a photo filter of sapia allowed a warmer presence. Looking at the background though the windows, the EXP file removed the maya world colour (using a jpeg would keep it, but would lower the colour quality). Placing a layer underneath, we paced a two tone colour (blue and yellow using a soft brush to blend) to give a sky appearance.
 |
| Image before Photoshop (jpeg 8 bit) |
 |
Final Image
Arnold AiSurfaceShader
Following the tutorial, we learnt a few more value of the Arnold AiStandardSurface shader.
Selecting each of the above objects, we placed a surface shader and then changed the settings to created each the items below and gained an understanding in how to obtain them.
|


No comments:
Post a Comment
Note: Only a member of this blog may post a comment.